
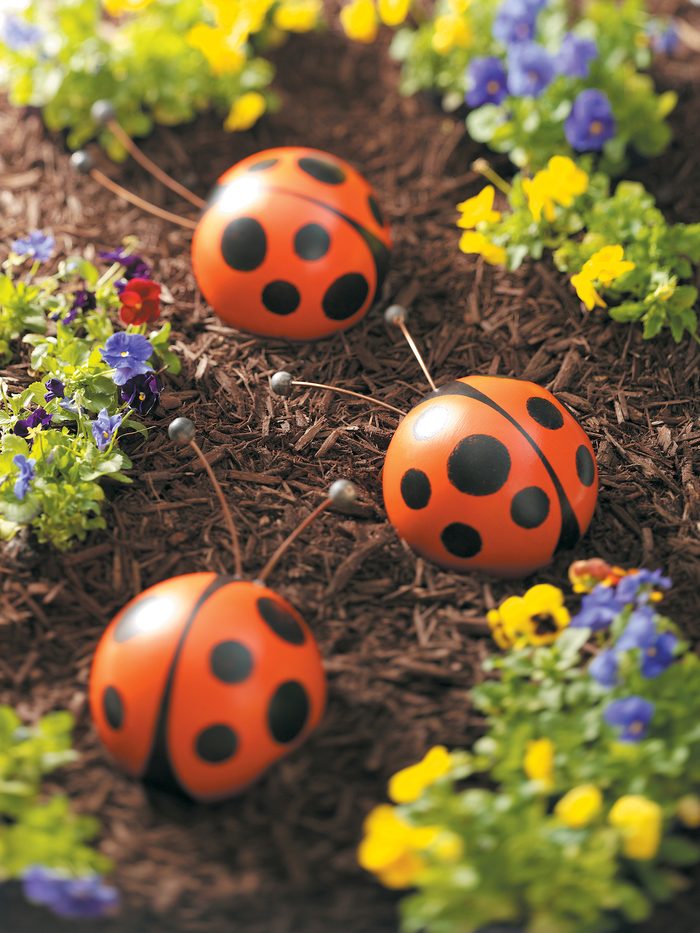
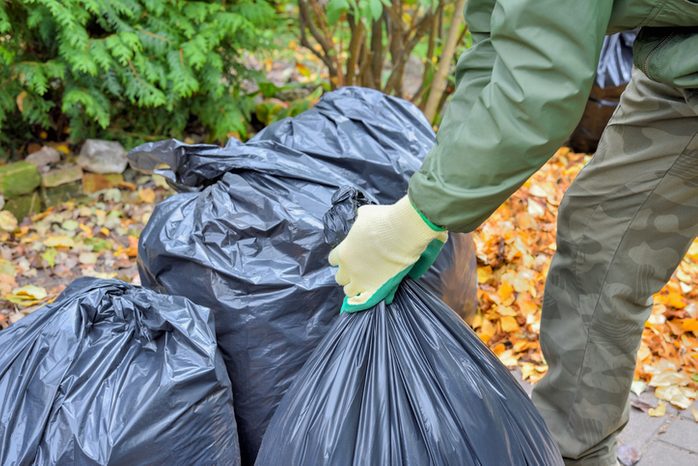
Retiring an old bowling ball? Create a striking ladybug for any garden—big or small. We got the idea for this bowling ball ladybug garden art craft project from reader Joyce Kline and had so much fun creating our own, we knew we had to share!
These garden pets are as easy as 1-2-3, so they’re a great project for kids to help with.
Editor’s note: A quart is the smallest can of mixed paint you can buy at the hardware store, but smaller quantities of acrylic hobby paint are available at craft stores. If you do have extra, use it to make a colony of bugs—or gifts for your envious neighbors! These cute critters also make perfect housewarming gifts and change-of-pace donations at charity raffles.
Here’s how to make DIY bowling pin butterfly garden art.
Materials:
- Bowling ball
- Black silicone caulk
- Two 8.5-inch lengths of #6 copper wire (have the hardware store cut it for you)
- Two 1-inch round wooden beads
- 1 quart Kilz exterior primer
- 1 quart red exterior latex paint
- 1 quart black exterior latex paint
- Painter’s tape
- Utility knife or scissors
- Stenciling brush or sponge
Step-By-Step Instructions:
Step 1
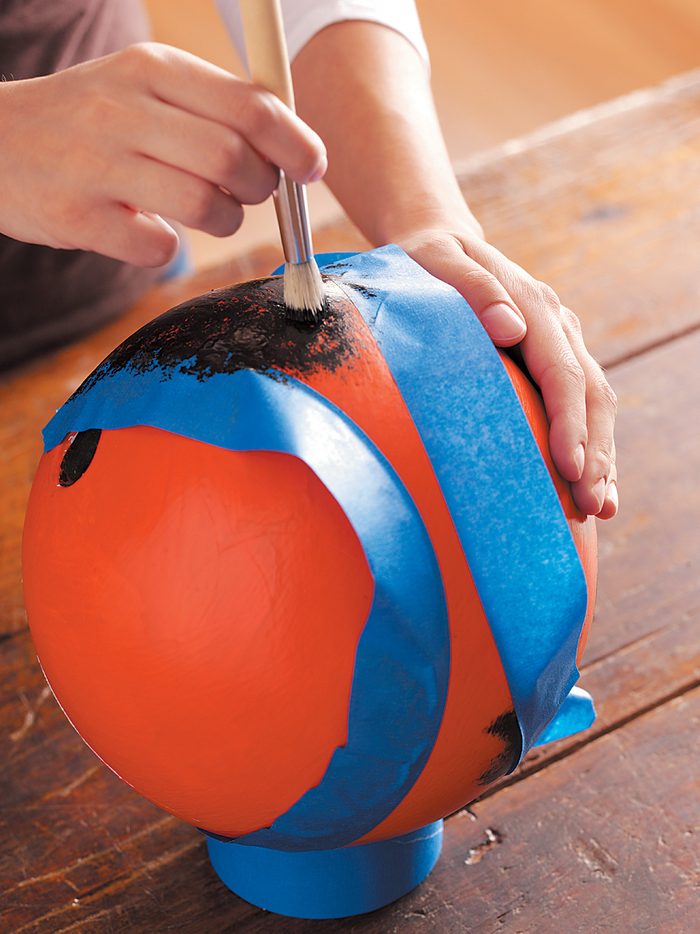
Prime and paint the bowling ball (three coats of red paint might be needed). After the paint is completely dry, apply painter’s tape in the desired pattern. Stipple on black paint with a stenciling brush or sponge for texture.
Step 2
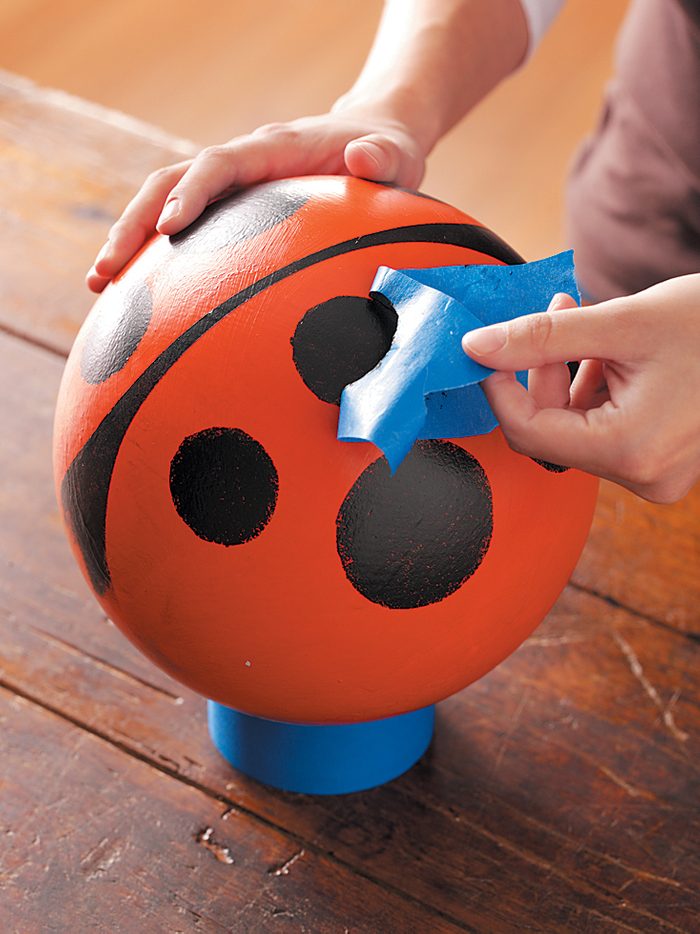
Make your own stencil by cutting differently sized circles from two pieces of painter’s tape put top to bottom. We used 2-1/2-inch- and 1-3/4-inch-diameter dots. Stipple the dots. After paint dries, remove the tape.
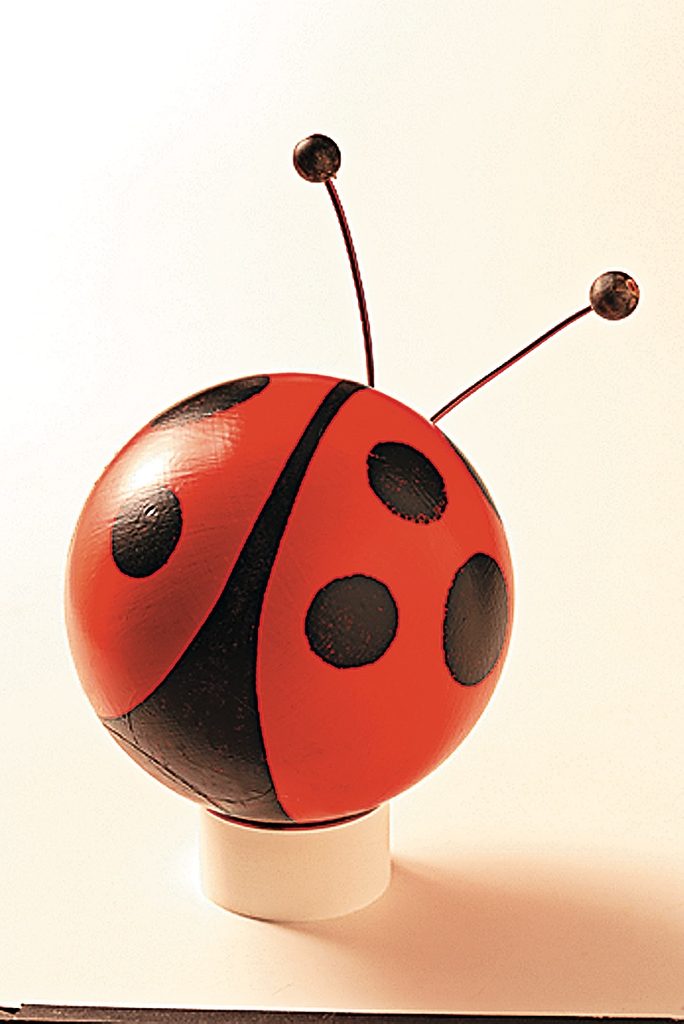
Step 3

Fill the thumb hole with black caulk. Set in two antennae made from lengths of copper wire with painted wooden beads affixed to the top. You may need to prop them up so they don’t droop while drying for 24 hours.
Step 4
This bowling ball ladybug is so easy to create, you may want to make a whole flock!
Next learn how to make bumblebee bowling ball garden art.
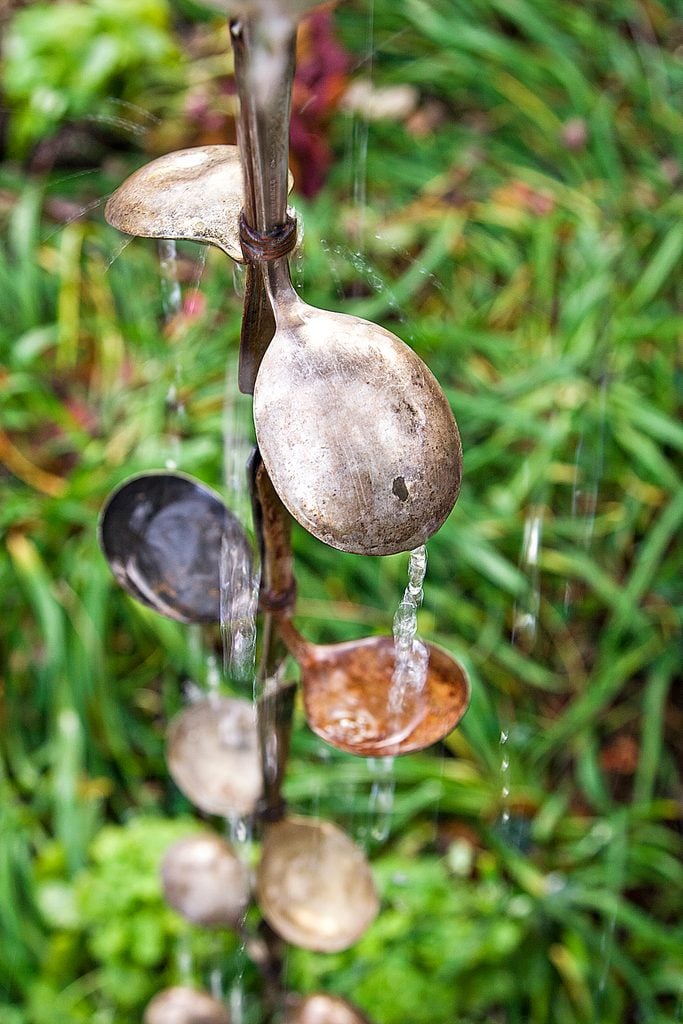
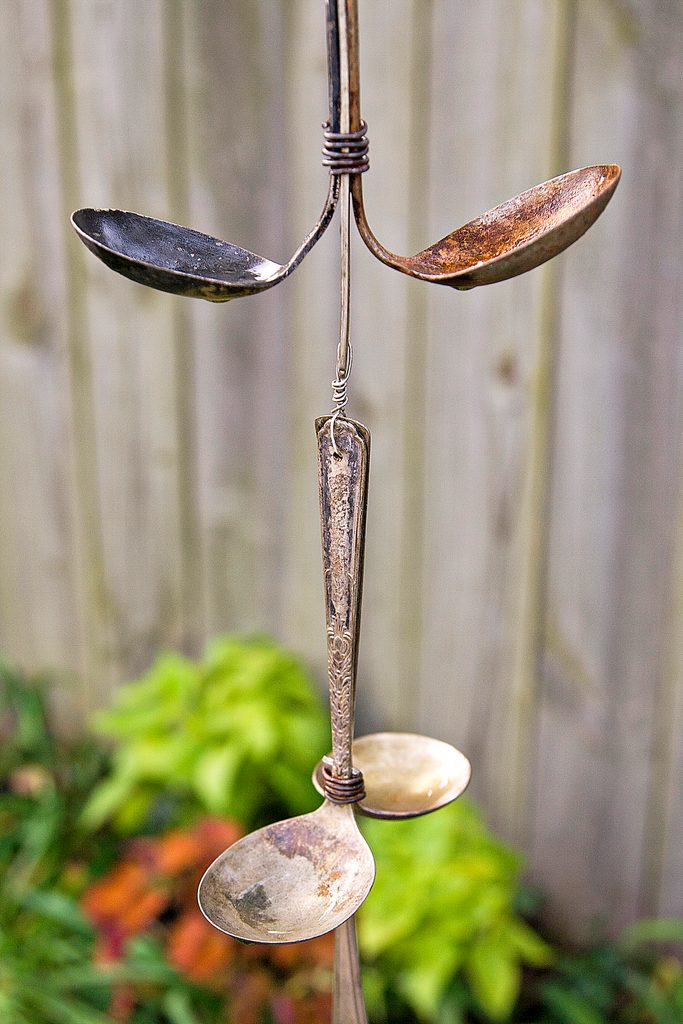
Rain chains are a beautiful way to harness the power of water. And if you want to know how make a rain chain, it’s easier than you probably expect. The concept is simple: Surface tension and gravity guide the water down a chain. DIY rain chains are great recycled crafts to make on a budget. I decided to make a chain out of salvaged spoons. If you’re looking for spoons at the thrift store, be sure to select thinner ones so they’ll be easy to bend and drill, and choose a wire that is rustproof and easy to manipulate.
Materials:
- DIY Rain Chain Materials
- Spoons
- Wire
- Drill
- Sharp drill bit
- Needle-nose pliers
- Bench vise or clamp and pliers
Step-By-Step Instructions:
Step 1
Decide how long you want the rain chain to be. Using a bench vise, bend enough spoons to complete the project. If you don’t have a vise, use a hand clamp to secure the flat part of the spoon against a table with the rest of it hanging over. Use pliers to bend the spoon down.
Step 2
Remove the bowls from a dozen or so spoons. Use the same method as in Step 1, only bend each spoon back and forth until the bowl snaps off.
Step 3
Drill holes in the end of each spoon handle, including the handles without bowls.
Step 4
Put two spoons together back to back so the bowls are facing outward. Fit a bowl-less handle between the handles of the two spoons, leaving several inches extended past the spoons. The protruding end of the handle should have the hole in it. Wrap wire around all three handles just above the bowls. Then wire together the handles of the spoons at the other end as tightly as you can. Be sure to leave some extra wire for attaching the next segment. Repeat this step until you’ve used all your spoons.
Step 5
Once all the segments are assembled, attach them to each other by twisting together the extra wire you left at both ends. Make sure to leave enough wire on one end of your chain for hanging.
Step 6
Hang the rain chain from a tree limb above a rain garden, or use it in place of a downspout above a splash block to direct water away from the house. You can also use a decorative glazed pot or rain barrel below the chain to collect water for use in the garden.
Next, check out the top 10 water-loving rain garden plants you should grow.
On This Page
Coastal Beach Birds You Should Know

Dipping your toes in the ocean surf should be on everyone’s bucket list. I didn’t make it to the coast until I was in my 20s, but that first splash of California salt water is something I’ll never forget. For hours, my buddy Scott and I scampered along the edge of the water with childlike enthusiasm. We found delight in peering into tide pools and following along as sanderlings scurried in and out with every wave. The beach hosts an amazing array of creatures—especially beach birds!
As birding locations go, it’s pretty remarkable to think that some avian species thrive exclusively along the coasts, never venturing away from the waves and sand. Yet they’re often overlooked, or dismissed as just “seagulls.” They clearly aren’t just bumming around on vacation, though. Let’s explore some of these beach birds.
Discover fascinating facts about wading birds.
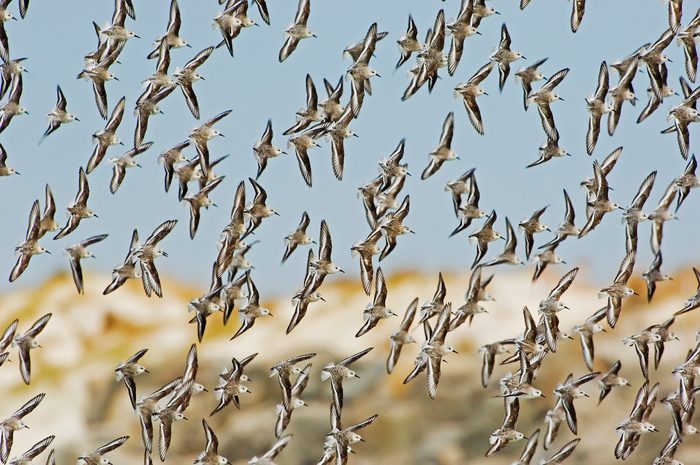
Sanderlings
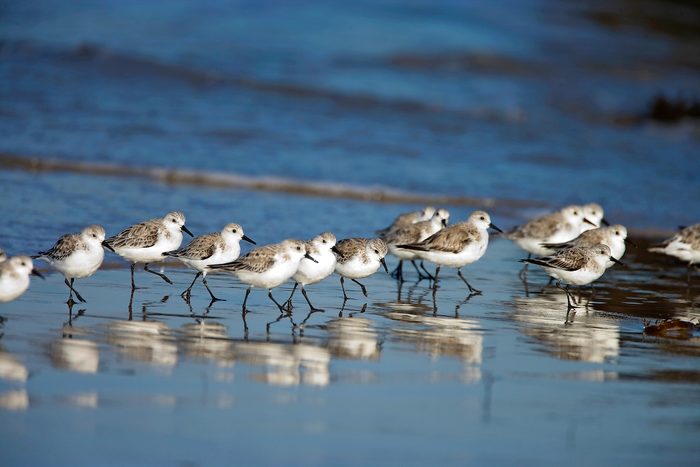
Not all shorebirds live at the edge of water, but there are plenty that do depend on the shifting ocean tides. There’s a good chance your first shorebird encounter, like mine, will be with sanderlings, members of the sandpiper family. These energetic beach birds are always scuttling about, darting in to grab a bite of food before outrunning the splash of the next wave. Sanderlings breed in the high Arctic but spend winters along sandy beaches nearly worldwide.
Take our shorebird quiz to see how many species you can identify.
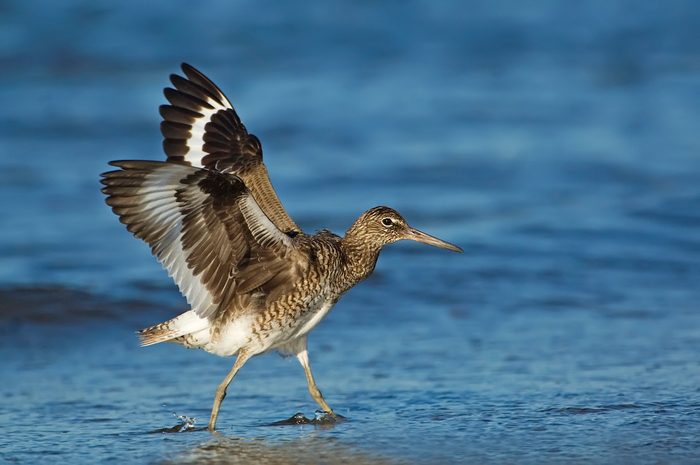
Sandpipers, Willets and Dunlins
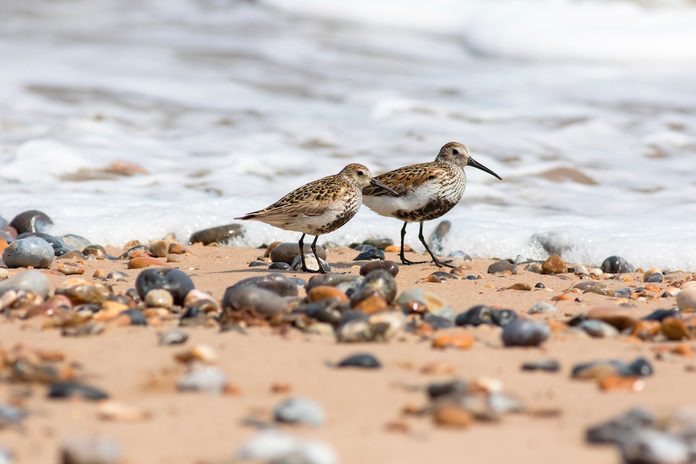
Some of the other sandpipers to look for are least, semipalmated and western. There’s also the red knot, which has a plump body and thick black bill, and the willet, a large 15-inch bird that you can find inland in some areas as well.
That’s just the beginning, though. The sandpiper group includes many others, which can make ID a bit tricky. But I encourage you to take on the challenge. It helps to have a good field guide with you. I personally like the Kaufman Field Guide to Birds of North America. It’s compact enough to fit in my back pocket—and, after all, Kenn Kaufman is one of the birding experts for Birds & Blooms.
Plovers
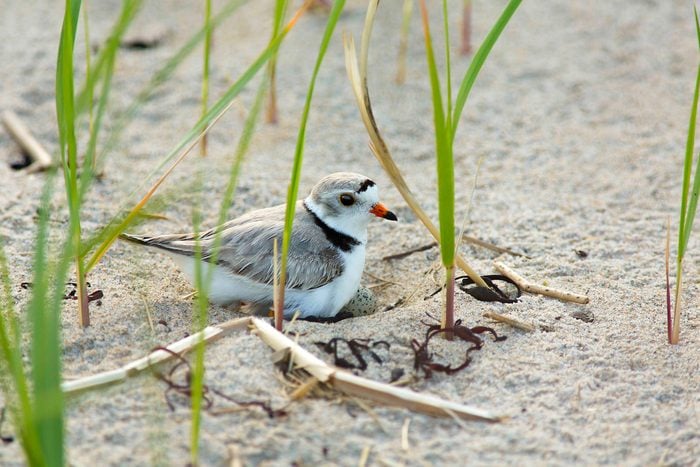
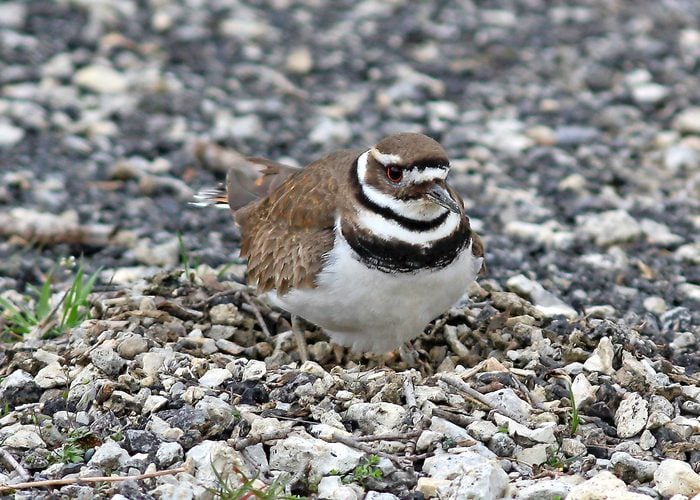
You’re almost guaranteed a few plover sightings if you’re visiting a beach town. Some plovers make their home on the coasts throughout the year, while others breed inland and winter at the beach. The killdeer, for instance, is a widespread plover that is as much at home at the edge of a parking lot as it is along the coast.
If you spot a similar-looking but smaller bird, you could be looking at a semipalmated plover. In addition to the size difference, semipalms have only one black neckband, while the killdeer has two. Another killdeer doppelganger is the rarer piping plover.
Two other coastal plovers are the Wilson’s and the snowy plover. The Wilson’s is content with coastal living year-round; it can be seen along the Gulf of Mexico and the Atlantic north to the Delmarva Peninsula. Snowy plovers are common on the Pacific and Gulf coasts, but their breeding grounds are also scattered through the western interior of North America.
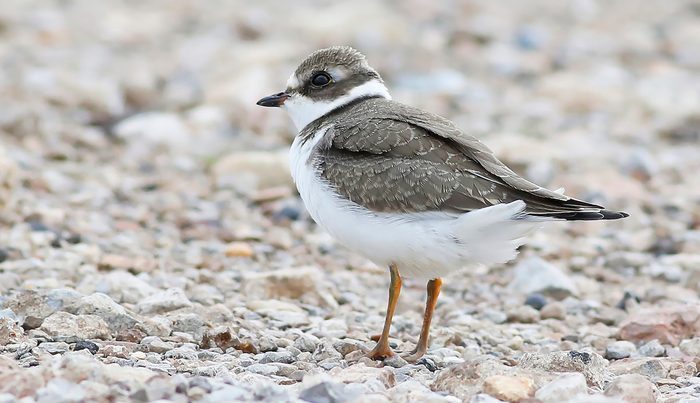
One more to look for is the black-bellied plover. Don’t let its name fool you—it doesn’t always have a black belly. It does always have black wingpits, though. These stout-bodied birds have short, thick bills; they winter along both coasts and the Gulf of Mexico, where they thrive on small invertebrates.
Gulls, Terns and Skimmers
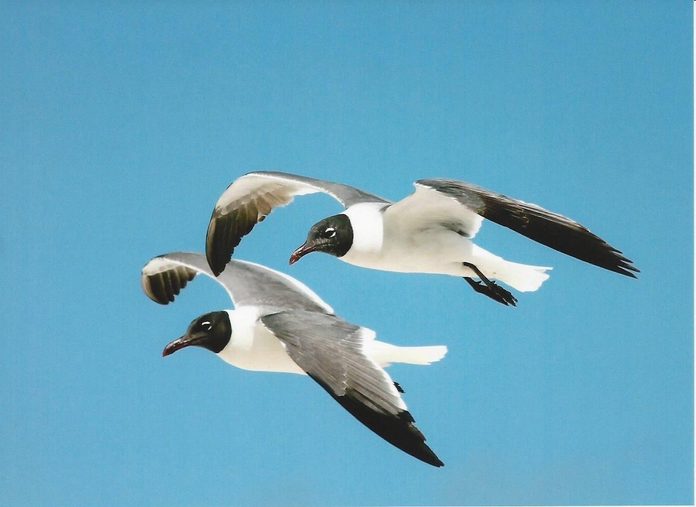
Although there’s no such thing as a “seagull,” there are many gulls that live by the sea. Laughing gulls in the East and glaucous-winged, western, and Heermann’s gulls in the West are species with limited ranges along the coasts. You’re likely to see the more widespread ring-billed and herring gulls at the beach, too.
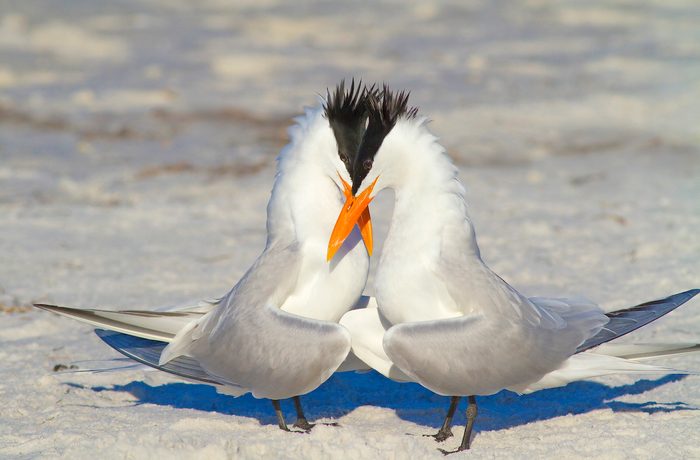
Terns are another group of conspicuous, mostly white coastal birds. They generally have thinner wings and appear daintier in flight than their relatives the gulls. Nearly a dozen species of terns can show up along the shore at some point. The species largely limited to coastal zones include the royal, elegant, roseate, sandwich and the somewhat confusingly named gull-billed.
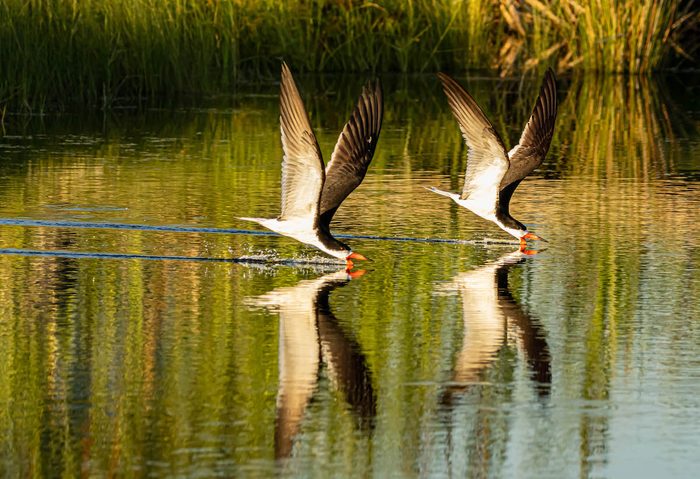
One highly specialized relative of the terns is the black skimmer. When foraging, the skimmer flies with its long lower bill in the water, trolling for minnows.
Pelicans and Oystercatchers
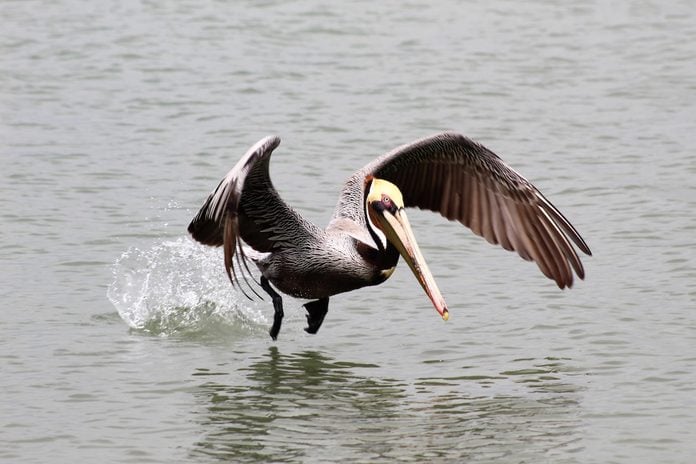
Some of the most familiar birds of the coasts today, brown pelicans were once rare. It’s fun to watch them plunge headfirst into the water to feed.
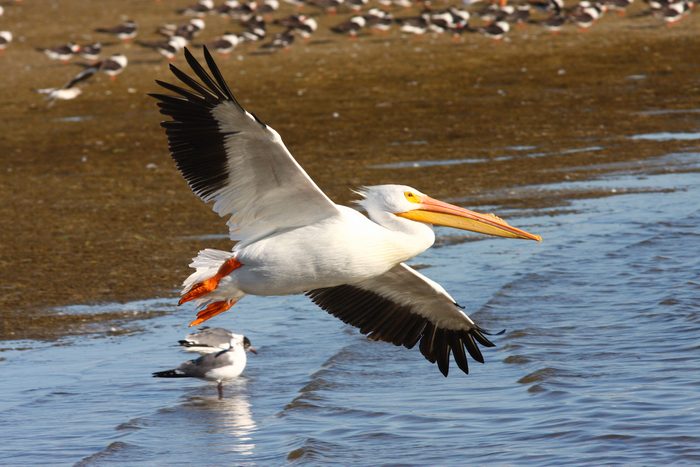
Look for American white pelicans, too.
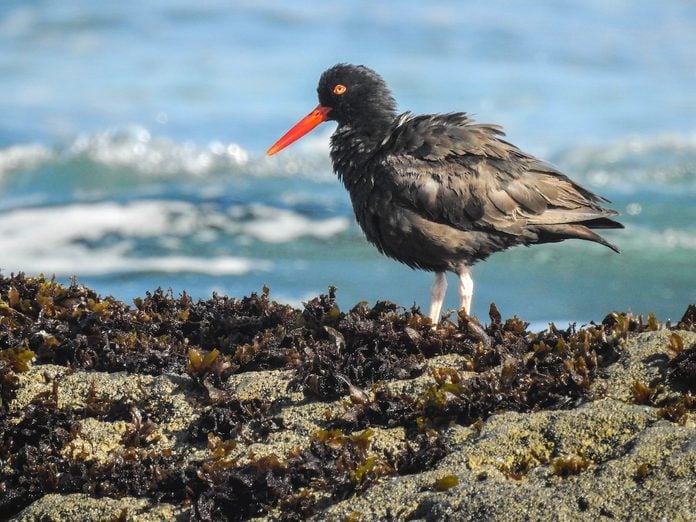
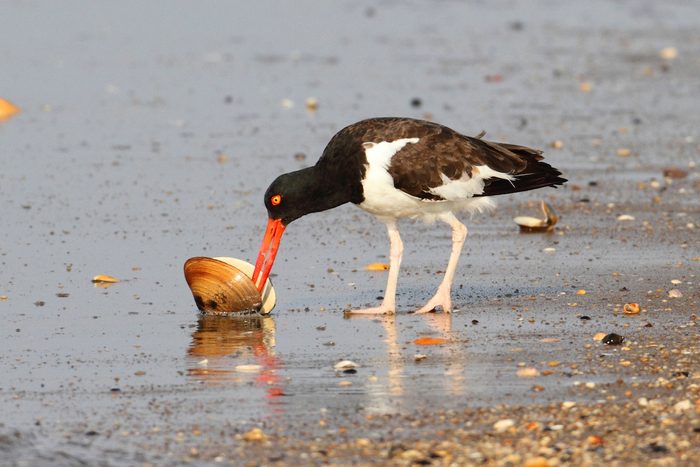
Other standouts are the black oystercatcher of the Pacific and the American oystercatcher of the Gulf and Atlantic coasts. Both sport massive orange bills that may look cartoonish but are essential in prying open oyster, mussel, clam and limpet shells.
Whether you’ve lived on the coast your entire life or are visiting for the very first time, you can’t help but notice that the seacoast is a special place. If you make your next vacation a coastal trip, you’re sure to spot many of these intriguing beach birds.
Hotspots for Beach Birds
Take a look at some of the best places in North America to see shorebirds and beach birds.
- Glacier Bay National Park, Alaska: With nearly 1,200 miles of coast, Glacier Bay provides ample opportunity to watch birds, along with the added bonus of the chance to see bears and glaciers.
- Point Reyes National Seashore, Point Reyes Station, California: Nearly 490 bird species have been recorded at Point Reyes National Seashore, making it a premier coastal birding location along the West Coast.
- J.N. “Ding” Darling National Wildlife Refuge, Sanibel, Florida: Named for the renowned political cartoonist, J.N. “Ding” Darling National Wildlife Refuge is critical habitat to a few species of sea turtle and plenty of beach birds.
- Chincoteague National Wildlife Refuge, Chincoteague Island, Virginia: Be it the Chesapeake Bay or the Atlantic Ocean, you’re never far from water anywhere along the Delmarva Peninsula, and Chincoteague is in the middle of the coastal birding action.
- Prince Edward Island National Park, Canada: A habitat for numerous bird species, this national park along the north coast of Canada’s Prince Edward Island is also where you’ll find Lucy Maud Montgomery’s childhood home, made famous in her book, Anne of Green Gables.
Next discover the unique desert birds of the Southwest.
Why Trust Us
For nearly 30 years, Birds & Blooms, a Trusted Media Brand, has been inspiring readers to have a lifelong love of birding, gardening and nature. We are the #1 bird and garden magazine in North America and a trusted online resource for over 15 million outdoor enthusiasts annually. Our library of thousands of informative articles and how-tos has been written by trusted journalists and fact-checked by bird and garden experts for accuracy. In addition to our staff of experienced gardeners and bird-watchers, we hire individuals who have years of education and hands-on experience with birding, bird feeding, gardening, butterflies, bugs and more. Learn more about Birds & Blooms, our field editor program, and our submission guidelines.
On This Page
Caladium Care and Growing Tips
- Common name: Caladium or angel wings
- Scientific name: Caladium bicolor
- Hardiness zones: 9 to 10, annual elsewhere
- Light needs: Partial sun to partial shade
- Size: 1 to 2 feet high and wide
- Soil: Must have well-draining soil or the tubers will rot
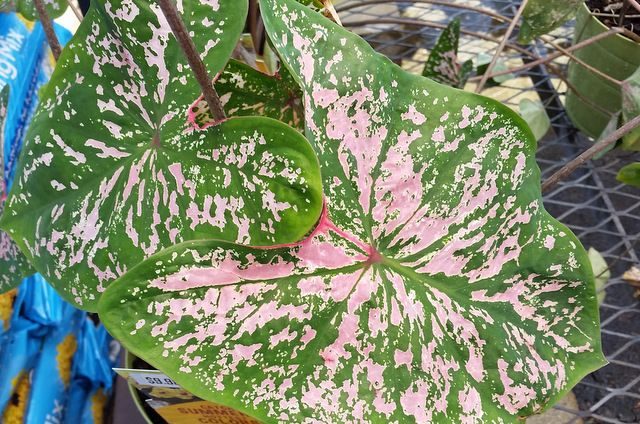
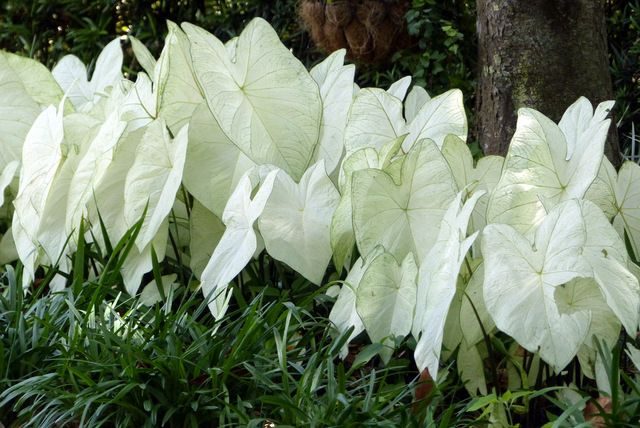
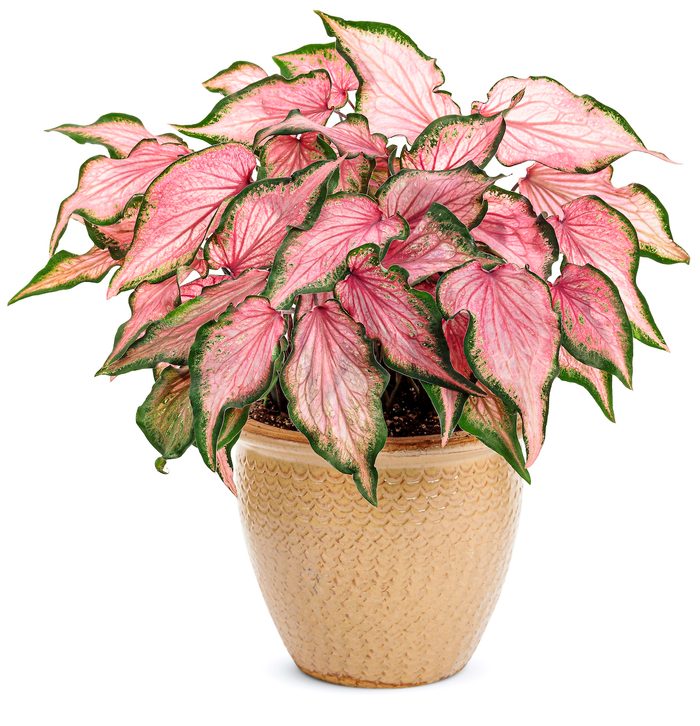
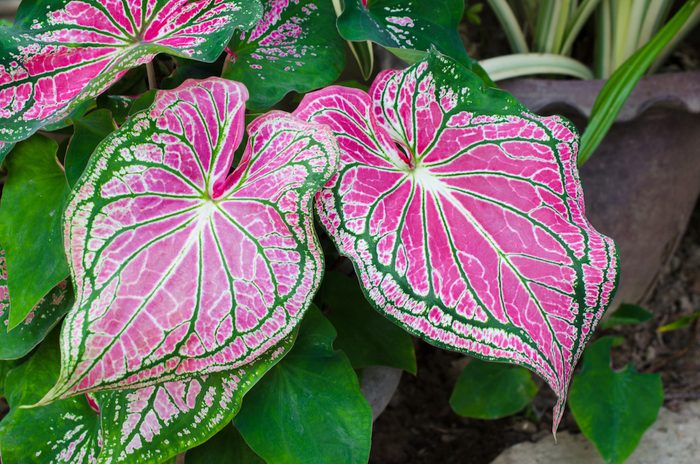
When you’re choosing new plants for your garden, chances are it’s usually flowers that catch your eye. But fascinating foliage can be a real asset to your garden too, and tropical caladiums are a terrific example. Their large leaves come in shades of white, pink, red, and combinations of all three. Caladium leaves can be heart-shaped or longer like spears, some with fancy ruffled edges. Best of all, they’re ideal in shade gardens, often the most difficult setting for plants to thrive.
Caladium Tubers
Caladiums (Caladium bicolor) are a tropical tuber (though they’re often sold as “bulbs”), native to South America and commonly known as Angel Wings. They thrive in moist humid environments, putting out their large long-lasting leaves quickly when warm wet weather arrives. They rarely flower, instead spreading underground like other tubers, though they aren’t usually considered aggressive.
Grow tropical plants for a lush outdoor oasis.
Caladium Varieties to Grow
In the wild, caladiums vary widely, and horticulturalists have taken advantage of that to produce a variety of cultivars. Dozens of types are available, all well-suited to shade gardens.
I’m particularly fond of the mainly white varieties, as they look particularly lovely in dappled shade. My personal favorites are ‘Moonlight’ and ‘White Delight.’
But if color is what you’re looking for, you’ll find reds and pinks like the Heart to Heart series, ”Freida Hemple’ or ‘Desert Sunset’. Some newer varieties are even able to withstand full sun.
Overwintering Caladiums
If you live in gardening zones 9 to 10, plant your caladiums in full to part shade and allow them to grow naturally. They’ll go dormant during the dryer winter season, and spring back to life when the rains of summer begin. In cooler areas, lift the tubers in the early fall, after the foliage begins to yellow and die. Allow them to dry out in a warm location for a few weeks, remove any remaining foliage, and store in dry peat moss until the soil warms up the following spring.
Sources
- University of Wisconsin-Madison Division of Extension
- Proven Winners
- White Flower Farm
- The National Gardening Association
- Monrovia
- Jackson & Perkins
Why Trust Us
For nearly 30 years, Birds & Blooms, a Trusted Media Brand, has been inspiring readers to have a lifelong love of birding, gardening and nature. We are the #1 bird and garden magazine in North America and a trusted online resource for over 15 million outdoor enthusiasts annually. Our library of thousands of informative articles and how-tos has been written by trusted journalists and fact-checked by bird and garden experts for accuracy. In addition to our staff of experienced gardeners and bird-watchers, we hire individuals who have years of education and hands-on experience with birding, bird feeding, gardening, butterflies, bugs and more. Learn more about Birds & Blooms, our field editor program, and our submission guidelines.
On This Page
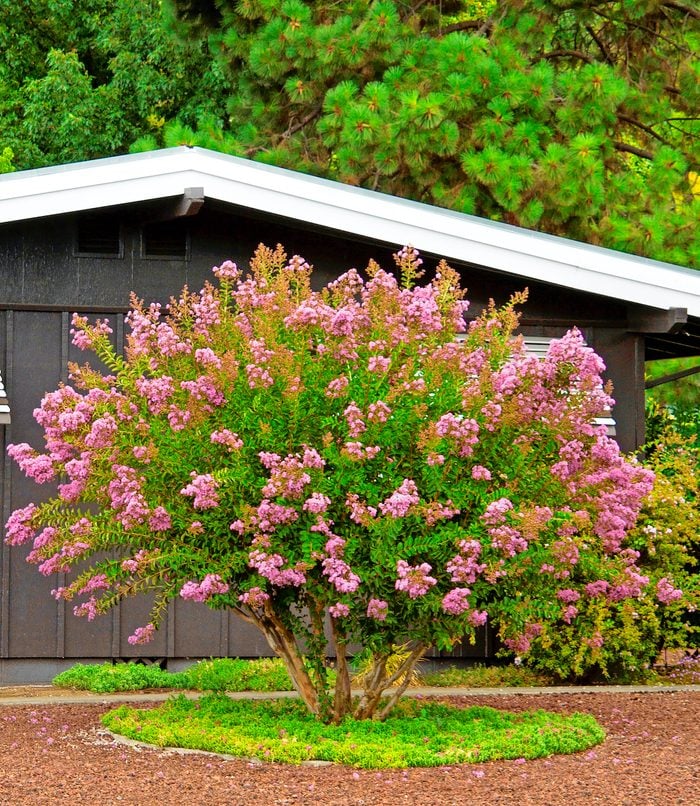
Crape Myrtle Tree and Shrub Care Tips
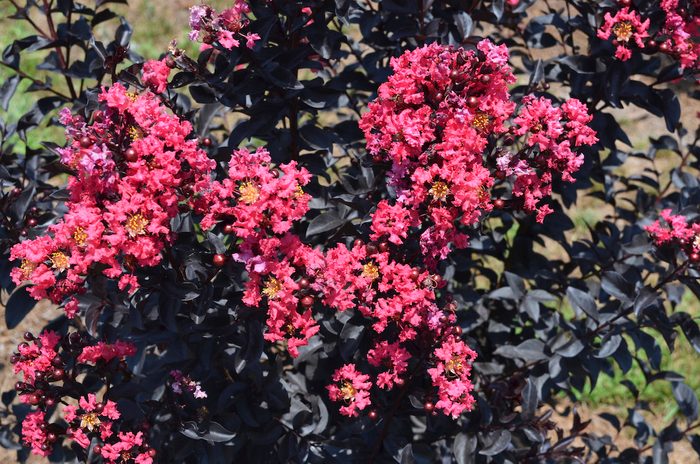
- Botanical name: Lagerstroemia spp.
- Common names: Crape myrtle, crepe myrtle, crapemyrtle, crepe-myrtle
- Hardiness zones: 6 to 10
- Size: 3 to 30 feet
- Soil: Moist, well-draining
- Water needs: Moderate
- Light needs: Full sun
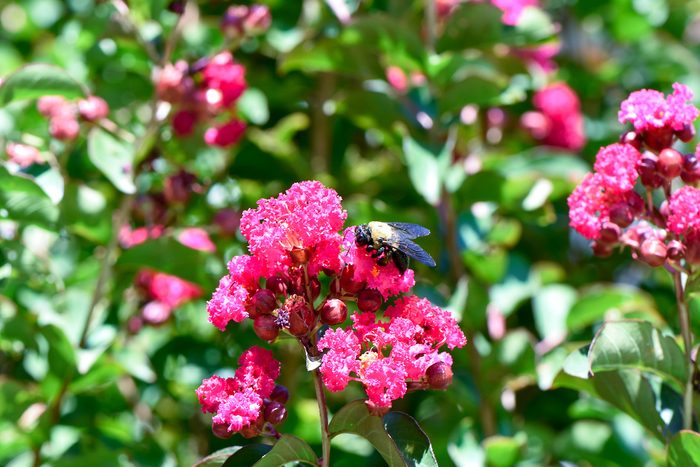
- Flower colors: White, pink, magenta, red
- Foliage: Deciduous, some foliage color in spring and fall
- Attracts: Bees, birds
This fast-growing (up to 5 feet per year) woody plant flowers all summer long, making crape myrtle a popular garden favorite. “Specimen trees can be great for shade in the summer,” says Tracy Harrison, Nursery Production Planning Manager at Monrovia. “Plenty of shrubs and groundcovers thrive under them and they can really anchor a landscape.” There are smaller shrub types for smaller garden spaces, too.
In the U.S., you’ll find a couple of species available, depending on your location, with multiple cultivars and varieties. The most common is Indian crape myrtle, L. indica. This species does well in heat, humidity, and drought.
Japanese crape myrtle, L. fauriei, is generally larger. Both may freeze to the ground in zones 6 and 7 winters, but usually regrow in the spring.
Is Crape Myrtle a Bush or Tree?
With such a wide array of sizes available, crape myrtle can be used as either a bush or a tree. “Varieties that can reach at least 15 to 20 feet are the best to tree form,” Tracy advises. “First, decide if you would like a single or multi-trunked form. From there it’s a matter of thinning and training to the desired form. Remove suckers and crossing branches up to at least head high to get that nice ‘see through’ look.”
If that seems like too much work, try using this plant as a bush or shrub instead. “I like the compact shrub-like crape myrtle, personally,” shares Tracy. “They’re a lot less work, as they’re expected to be dense plants and can be sheared back in late winter and other times during the growing season.”
Where and How to Plant Crape Myrtle
This flowering beauty needs lots of sunlight to thrive. During the growing season, it’s fairly water-hungry, but it prefers well-drained soil at all times. Tracy suggests applying a complete slow-release fertilizer just as they’re breaking dormancy in the spring.
Can You Grow Crape Myrtle in Containers?
Plant crape myrtle anywhere that receives lots of sunlight, including in pots. Choose smaller varieties for containers, and display them around the patio or pool for pops of bright summer color. You can also use smaller or intermediate size types as foundation plantings.
How to Prune Crape Myrtle
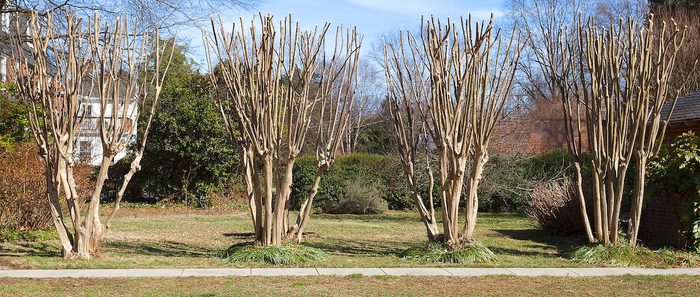
There’s a lot of disagreement out there on the proper way to prune a crape myrtle. Some prune crape myrtles back heavily each year, trimming all branches and leaving only an unsightly stump. While it’s true that crape myrtles flower on new growth, there’s no real need to prune them so heavily, and there’s a reason that some horticulturalists jokingly call this “crape murder”.
“Crape myrtles are extremely tough and can take pruning well,” Tracy notes. “I prefer to limb and train up a natural canopy on the tall trees. Pruning should occur in the late winter prior to the plant breaking dormancy. Thin any crossing branches, suckers, or unwanted growth that are not needed for the desired structure. If the plant has plenty of room, then only the prior year’s seed pods should be pruned out.”
Remember that pruning any plant opens it up to the possibility of disease or pests, just like a cut on human skin. Prune sparingly and carefully, following Tracy’s directions: “Make a cut close to the trunk or larger branch that the unneeded branch is attached to. Just try not to cut into the branch collar so the tree can heal as quickly as possible.”
Crape Myrtle Pests and Diseases
While crape myrtles are generally fairly easy to grow, Tracy recommends watching out for a few pests and diseases
- Powdery mildew: Some varieties are more resistant than others, so if you experience this fungus often in your garden, look for those bred to resist it.
- Foliar leaf spots: These can occasionally cause leaf drop, but don’t usually affect the overall plant health.
- Ambrosia beetles: If you see toothpick-like sawdust on the trunk or branches, you likely have an infestation. Treatment requires aggressive use of pesticides, so it may be best to cut the tree down instead.
- Aphids: Black mildew grows on aphid honeydew, and can be unsightly. Try removing aphids with a strong squirt from the garden hose, or use insecticidal soap.
Top Crape Myrtle Varieties for Your Garden
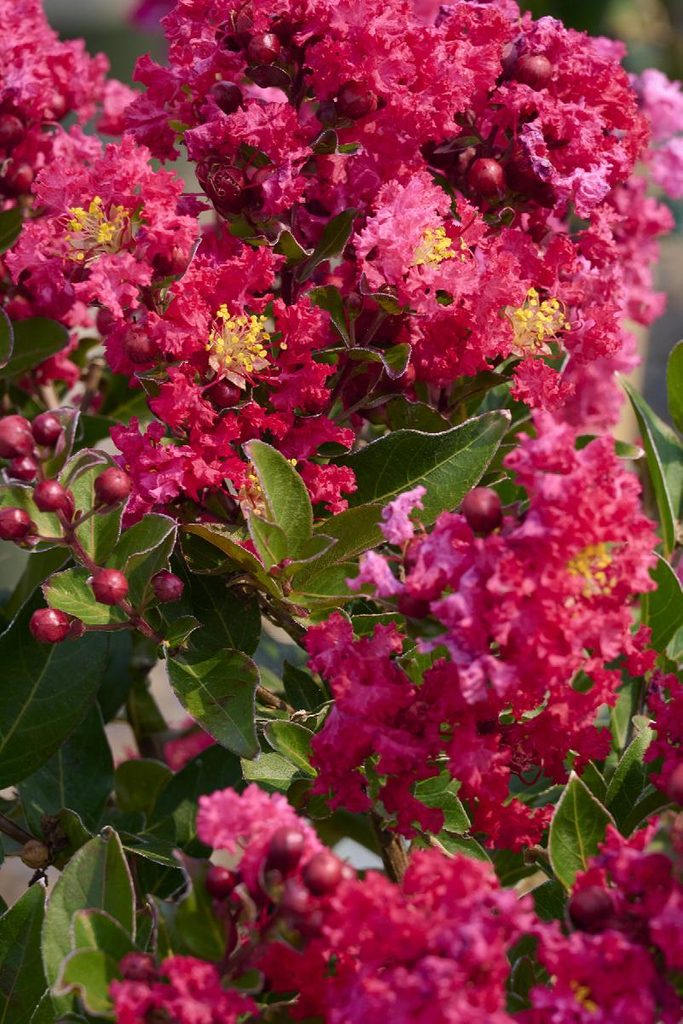
Compact bush-types have a lot of advantages, including some with beautiful colors on the new spring foliage. “This trait alone is great for a foundation plant. but with these you get the added benefit of abundant flowers in many colors that often contrast against the backdrop of the foliage,” raves Tracy. “At Monrovia we have the Summerlasting series that I love. My favorite is a glossy red new growth compact variety named Summerlasting Strawberry.”
For tree-form crape myrtles, choose medium or large varieties like Dynamite, Muskogee, or Natchez. In zone 6, try Red Rocket for its cold-hardiness properties.
About the Expert
Tracy Harrison is the Nursery Production Planning Manager at Monrovia’s Cairo, Georgia, nursery location. He studied horticulture at the University of Georgia, and has been a Monrovia Craftsman for 30 years.
Sources
- Plantingtree.com – Choosing the right crape myrtle tree
- North Carolina State Extension – Ambrosia beetle
- University of Florida Institute of Food and Agricultural Sciences
- Monrovia
Why Trust Us
For nearly 30 years, Birds & Blooms, a Trusted Media Brand, has been inspiring readers to have a lifelong love of birding, gardening and nature. We are the #1 bird and garden magazine in North America and a trusted online resource for over 15 million outdoor enthusiasts annually. Our library of thousands of informative articles and how-tos has been written by trusted journalists and fact-checked by bird and garden experts for accuracy. In addition to our staff of experienced gardeners and bird-watchers, we hire individuals who have years of education and hands-on experience with birding, bird feeding, gardening, butterflies, bugs and more. Learn more about Birds & Blooms, our field editor program, and our submission guidelines.
On This Page
Asian Jumping Worms vs Earthworms
![Invasive Earthworm Amynthas Agrestis [tentative Id]](https://www.birdsandblooms.com/wp-content/uploads/2024/04/6953504495_465c02c8f7_o.jpg?fit=700%2C1024)
As an invasive species, jumping worms are harmful because they consume organic matter and degrade the topmost layer of soil. This can make the soil non-conducive to native plant growth and often leaves it inhospitable to anything except for invasive plants. Soil these worms have infested is often granular, with a consistency similar to that of coffee grounds.
The easiest way to recognize jumping worms vs earthworms is by their movement. They move quickly, slithering and thrashing like snakes. In addition, be on the lookout for key differences in appearance. Jumping worms have a brownish gray color, while earthworms are pink or red; their bodies are firm, rather than floppy.
Got holes in your leafy greens? You have cabbage worms.
How to Get Rid of Jumping Worms
![Invasive Earthworm Amynthas Agrestis [tentative Id]](https://www.birdsandblooms.com/wp-content/uploads/2024/04/6807385430_5b962ddc40_o.jpg?fit=700%2C1024)
Gardening expert Melinda Myers says, “Unfortunately, there is no magic cure for jumping worms. Collect and dispose of them as they are found. Toss them into a clear plastic bag to kill them or into a container of isopropyl alcohol before adding them to the trash.
Many gardeners use the mustard test to determine their presence and drive them to the soil surface: Mix 1/3 cup ground hot yellow mustard seed into a gallon of water, then drench the garden area with this mixture. This drives these worms (and other earthworms) to the soil surface, where you can remove and kill the jumping worms.
Heat is another option. The adults, eggs and cocoons are killed when exposed to temperatures over 104 degrees for three days. This is ineffective for garden beds, as the worms move away from the heat, but you can use the sun’s power to kill jumping worms in mulch, compost and topsoil.
Spread a 6-inch layer of these materials on a sheet of plastic placed in a sunny location. Wrap and secure the plastic around the mulch, compost or soil. Check the temperature to make sure it’s above 104 degrees for at least three consecutive days.
BotaniGard has been found to provide some control. As always, read and follow label directions.”
Here’s how to stop the tomato hornworm from damaging your tomatoes.
Prevent Asian Jumping Worm Infestations
If possible, you want to keep these invasive worms from moving into your yard in the first place.
Melinda says, “You can prevent jumping worm infestations and keep them from spreading by cleaning tools and shoes when moving from one garden to another. Don’t share plants, and ask mulch, compost and topsoil providers how they manage jumping worms before purchasing.”
Next, learn how to control caterpillars that are garden insect pests.
About the Expert
Melinda Myers is the official gardening expert for Birds & Blooms. She is a TV/radio host, author and columnist who has written more than 20 gardening books. Melinda earned a master’s degree in horticulture from the University of Wisconsin-Madison.
Sources
- PennState Extension, “Look Out For Jumping Earthworms!“
- Cornell Cooperative Extension Warren County, “Invasive Asian Jumping Earthworms“
- Wisconsin Department of Natural Resources, “Jumping worms“
Why Trust Us
For nearly 30 years, Birds & Blooms, a Trusted Media Brand, has been inspiring readers to have a lifelong love of birding, gardening and nature. We are the #1 bird and garden magazine in North America and a trusted online resource for over 15 million outdoor enthusiasts annually. Our library of thousands of informative articles and how-tos has been written by trusted journalists and fact-checked by bird and garden experts for accuracy. In addition to our staff of experienced gardeners and bird-watchers, we hire individuals who have years of education and hands-on experience with birding, bird feeding, gardening, butterflies, bugs and more. Learn more about Birds & Blooms, our field editor program, and our submission guidelines.
On This Page
Common Yellowthroat Song

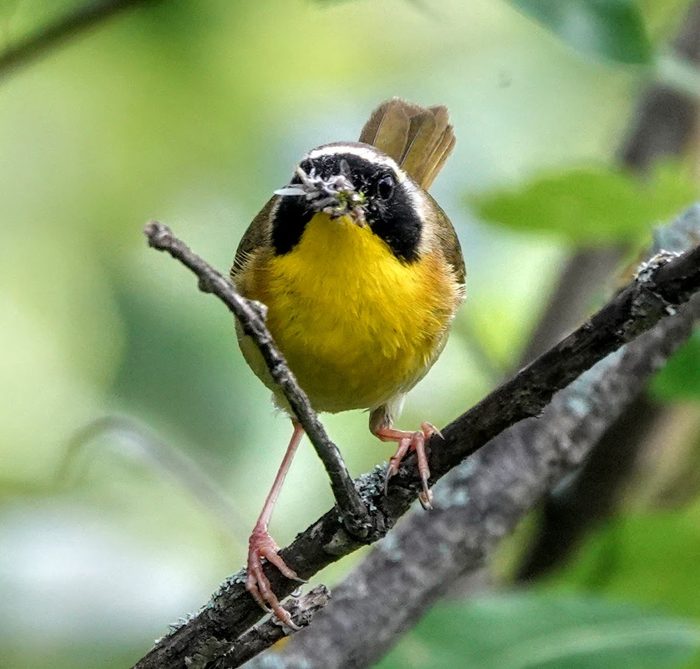
Step into your backyard on a summer morning, and you’re likely to be greeted by a chorus of chirps and trills. Robins are carol cheerily cheer-up, and chickadees scold chickadee-dee-dee-dee. Suddenly, a different tune stands out, a snappy wichity-wichity-wichity. A search toward the sound along an unruly hedge reveals a common yellowthroat.
Often, it’s the sound of this colorful warbler rather than its bold black and yellow plumage that you first notice. Common yellowthroats are not rare but they are elusive, mostly staying within the protective cover of shrubs. What a treat to hear and see one!
The song is also sometimes described as which-is-it, which-is-it, which-is-it. Also, listen for a sharp chip when the bird is hidden in a brambly bush or tangle of low shrubs and grass.
Bird sounds courtesy of The Cornell Lab of Ornithology
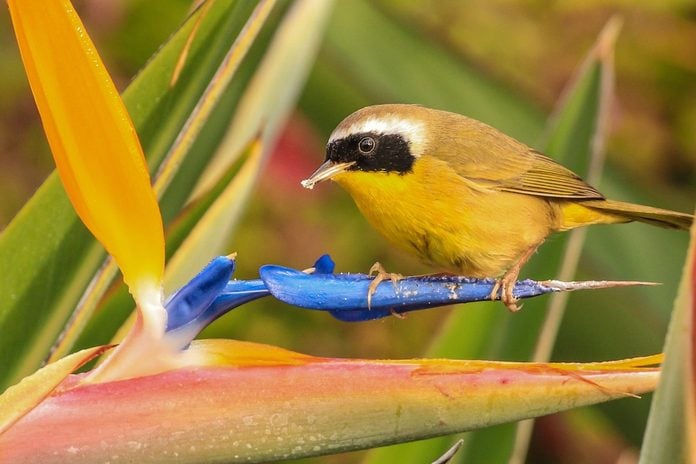
What Does a Common Yellowthroat Look Like?
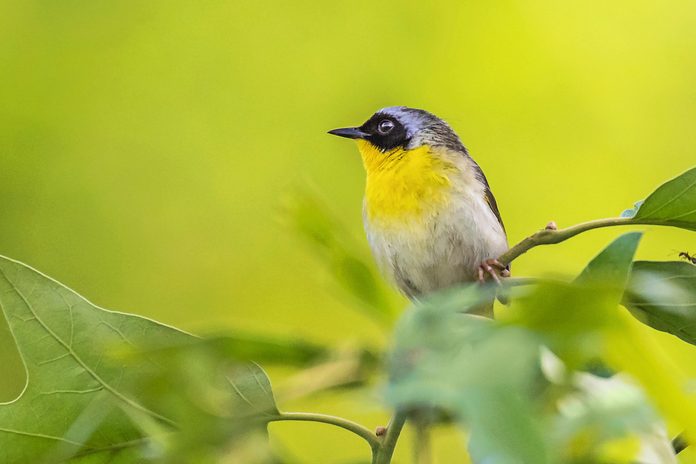
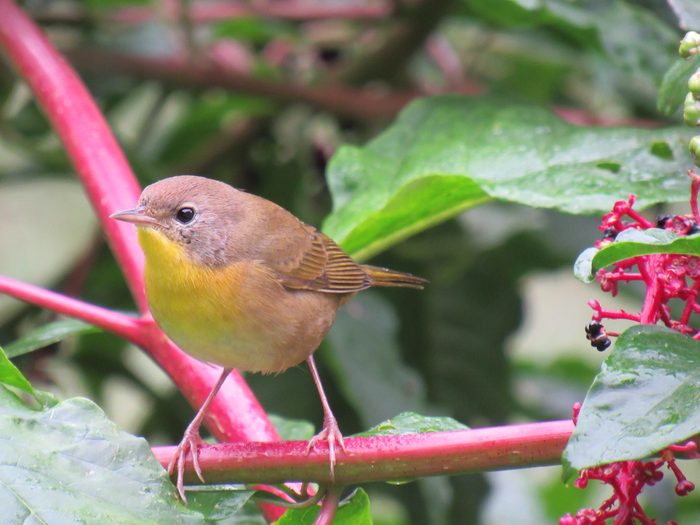
As their name suggests, a mature male common yellowthroat has a distinctive bright yellow throat. Sometimes nicknamed “yellow bandit” due to its prominent black mask, it’s similar in size to a sparrow, about five inches long with a medium-long tail, olive back, and sharp beak. Females also have a yellow throat, though paler, with a brownish head and back and no mask.
“The first time I saw photo of a male common yellowthroat, I knew that this was a bird I could identify without having to figure out whether it has an eye ring or faint wing bars, or some other minute detail,” says Pam Otto, a naturalist with the St. Charles, Illinois Park District who teaches birding classes and leads birding walks.
“His black mask and yellow throat are so bold and unique that the species is unmistakable. That is, if you can see him. The other thing I love about these birds is their elusiveness. They’re often heard, but seeing them is another matter entirely. I always feel lucky if I’m able to spot a common yellowthroat singing,” she says.
Range and Habitat
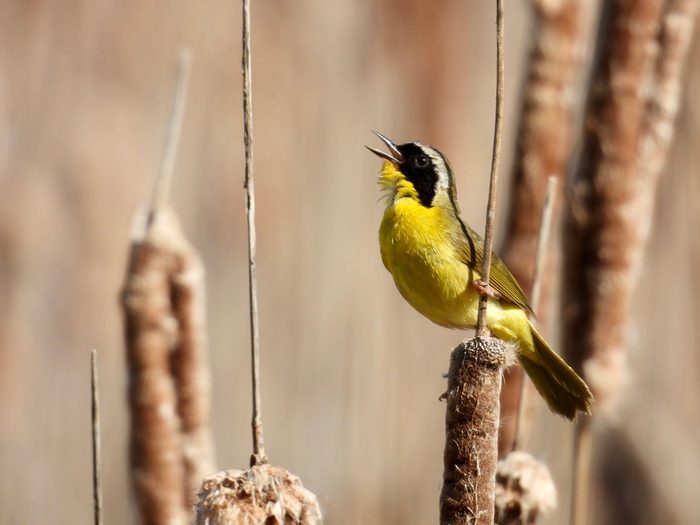
Common yellowthroats breed in the low, dense, tangled vegetation around wetlands and riparian areas across North American, though you can sometimes spot them along the edges of drier upland forests and hedgerows. Although they try to remain out of sight, you might see one flit out of the reeds to snatch a bug, perch atop a cattail to call out its territory, or simply because its curious about an unfamiliar sound.
As summer wanes, yellowthroats migrate, traveling at night, to similar marshy habitats in the southern United States and as far south as Central America.
Common Yellowthroat Nesting Habits
“Common yellowthroats are the only New World warbler that actually nest in marshes,” says Pam. “Prothonotary warblers can be found in tree cavities in swamps, but marshes typically are treeless. Yellowthroats usually nest in low vegetation or on the ground, so a lack of trees is not an issue for them.”
The males arrive first in the spring, loudly proclaiming their spot and to attract a mate, though the females are often unfaithful after courtship. After mating, a female weaves a well-hidden, cup-shaped nest out of grasses, leaves and sedges, sometimes with a roof. She then lays one to six white, speckled eggs. The chicks hatch in just 12 days.
Both the male and the female feed the chicks, which fledge in eight to 12 days.
What Do Common Yellowthroats Eat?
Like other warblers, the common yellowthroat primarily eats insects, spiders and insect larvae. They pluck bugs off low vegetation and sometimes from the air, but they’ll also snack occasionally on flower nectar, bark, branches, and fruit, especially as winter and bugs are in short supply.
While not typically attracted to a feeder, they might pass through your backyard while migrating if the yard is big enough (at least a half-acre) and not immaculately manicured.
“Most yards are too neat or too small to be of interest to common yellowthroats, but if someone has a large piece of property, ideally near a wetland, and they have lots of sedges, grasses and other plants that have dense, tangled growth habits, the common yellowthroats will find them,” says Pam.
About the Expert
Pam Otto is an outreach ambassador and naturalist with the St. Charles Park District in St. Charles, Illinois. She has taught birding classes and led birding walks for 25 years.
Sources
- All About Birds – common yellowthroat
- National Audubon Society – common yellowthroat
- Smithsonian’s National Zoo – common yellowthroat
- Interview with Pam Otto
Why Trust Us
For nearly 30 years, Birds & Blooms, a Trusted Media Brand, has been inspiring readers to have a lifelong love of birding, gardening and nature. We are the #1 bird and garden magazine in North America and a trusted online resource for over 15 million outdoor enthusiasts annually. Our library of thousands of informative articles and how-tos has been written by trusted journalists and fact-checked by bird and garden experts for accuracy. In addition to our staff of experienced gardeners and bird-watchers, we hire individuals who have years of education and hands-on experience with birding, bird feeding, gardening, butterflies, bugs and more. Learn more about Birds & Blooms, our field editor program, and our submission guidelines.
On This Page
Rugosa Rose Care and Growing Tips
- Common names: rugosa rose, beach rose
- Botanical name: Rosa rugosa and hybrids
- Hardiness zones 3 to 10
- Light needs: Full sun
- Soil: Moist, well-draining
- Size: 3 1/2 feet to 6 tall and wide
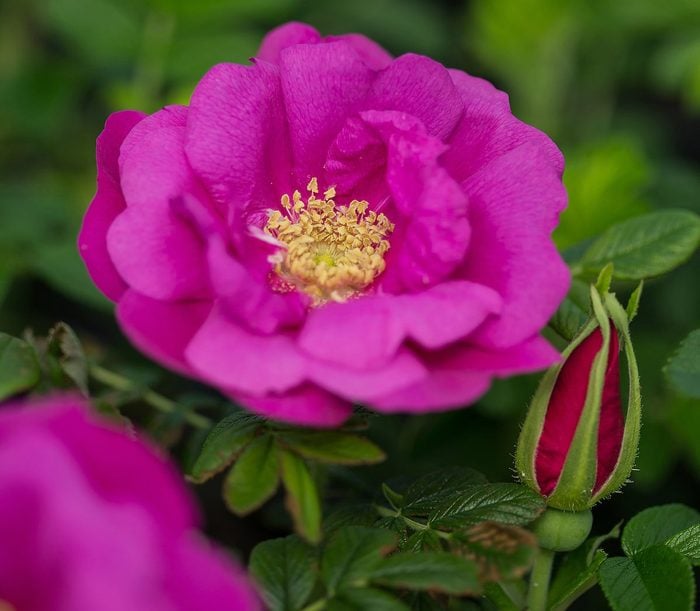
Rugosa rose is a tough and adaptable shrub rose native to Asia. Its name Rugosa translates in Latin as “wrinkled” because of its leathery, dark green foliage. The plants can be heavily thorned. The blooms, ranging from white to magenta and rarely yellow, can be single or double. They are often quite fragrant, usually displaying an open center full of bright yellow stamens.
Indiana-based rosarian Teresa Byington, who consults for the American Rose Society, says rugosas are so resilient that there’s one for nearly every sunny garden.
While they will grow even in sandy coastal regions, a rugosa rose prefers acidic to neutral, moist, and well-draining soils in full sun. Rugosas can tolerate significant drought and even salt spray. Deer may nibble the flowers, but won’t do much damage to the well-armed stalks.
Their most profuse bloom is during early summer, but Teresa says deadheading will encourage rebloom through the growing season.
She appreciates the spicy-sweet fragrance of their flowers, their bright fall hips, and the rugged disposition of their disease-resistant foliage.
Unlike many roses, rugosas prefer a hands-off approach. She says, ” they do not respond well to any kind of sprays,” making them “excellent choices for the organic gardener.”
Pruning Rugosa Roses
As a group, roses are notorious for needing regular pruning, but your rugosa rose will need very little pruning.
“Rugosas do not need the type of pruning many roses need, but can be pruned to control size,” Teresa says. She recommends pruning out dead wood and oldest canes from the base in late fall or very early spring. If overgrown, they are tough enough even to handle being pruned down to a foot tall, she says.
Are Rugosa Roses Invasive?
The plants are easy to grow and can spread by seeds and suckering, making a fast-growing hedge or barrier. They have become invasive in Maine, so check your state’s invasive plant list before planting, especially near wild areas.
Rugosa Rose Wildlife Benefits
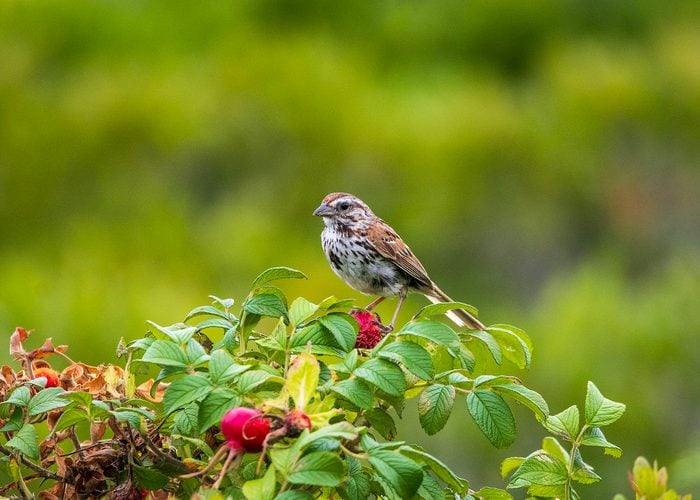
Bees love their flowers and birds devour their seed heads, called hips. Their dense branches offer small birds winter shelter, too.
Rugosa Rose Hips
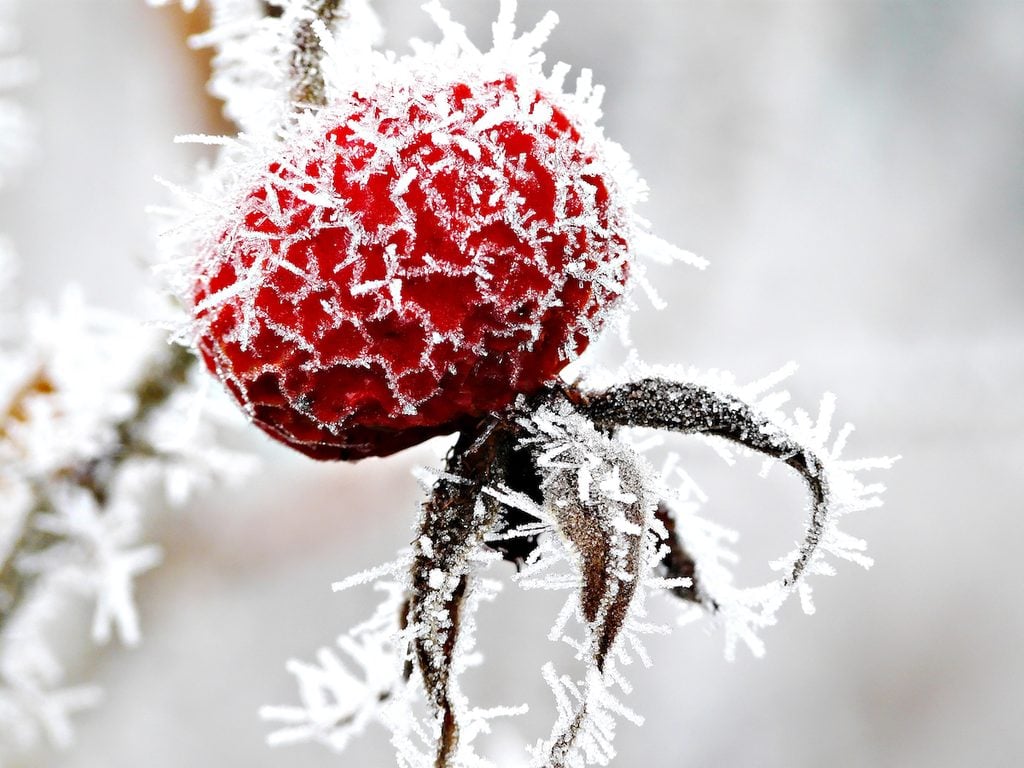
Thanks to their one-inch orange-red hips in fall, rugosas are sometimes called “sea tomatoes.”
Rugosa rose hips have more vitamin C than oranges and can be used to make a delicious tea, jam or jelly. Rugosa rose hips are said to be the most delicious in the rose family.
About the Expert
Sources
- American Rose Society
- Maine Department of Agriculture, Conservation & Forestry
- The Garden Diary
- Missouri Botanical Garden
Why Trust Us
For nearly 30 years, Birds & Blooms, a Trusted Media Brand, has been inspiring readers to have a lifelong love of birding, gardening and nature. We are the #1 bird and garden magazine in North America and a trusted online resource for over 15 million outdoor enthusiasts annually. Our library of thousands of informative articles and how-tos has been written by trusted journalists and fact-checked by bird and garden experts for accuracy. In addition to our staff of experienced gardeners and bird-watchers, we hire individuals who have years of education and hands-on experience with birding, bird feeding, gardening, butterflies, bugs and more. Learn more about Birds & Blooms, our field editor program, and our submission guidelines.
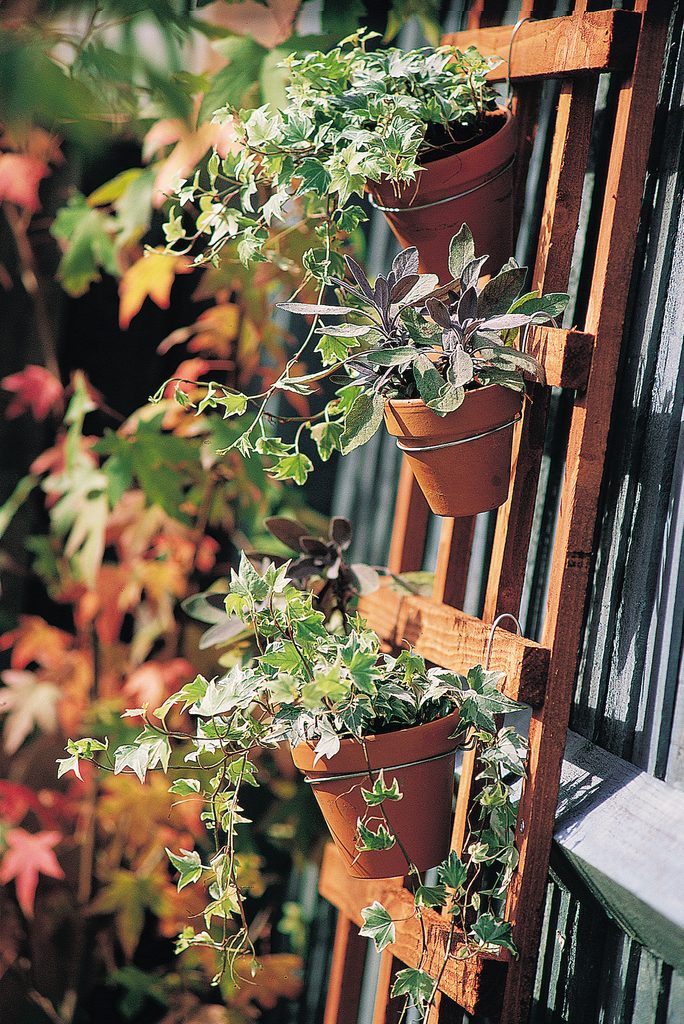
Have some old clay pots lying around? Brighten up a bare fence or wall with this simple pot trellis. You can change the look as often as you like—just unhook the pots and pop in fresh plants.
Materials:
- Trellis
- Clay pots
- Galvanized Wire
- Wire Cutters
- Pliers
Step-By-Step Instructions:
Step 1
You can build a trellis yourself with leftover scrap wood using nails to hold it together, or you can buy a trellis to suit the site or cut one to fit. You may wish to stain or paint it with exterior paint first. Then place the trellis in its spot, making sure the horizontal bars are sturdy enough to hold the weight of potted plants.
Step 2
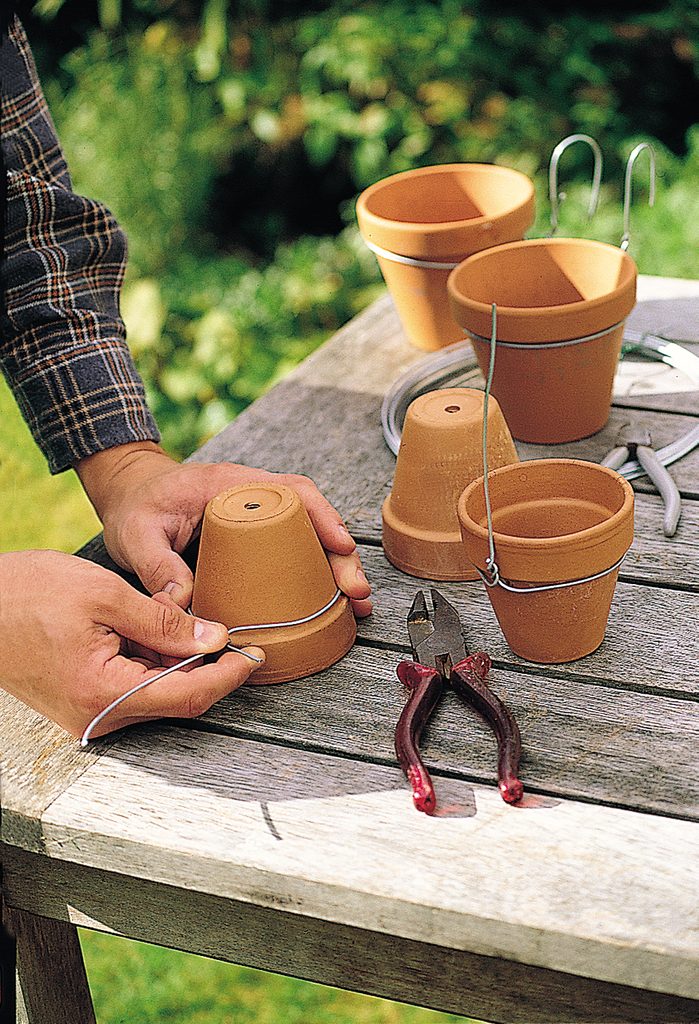
To fashion a pot loop, bend a length of galvanized wire to fit snugly beneath each pot rim.
Step 3
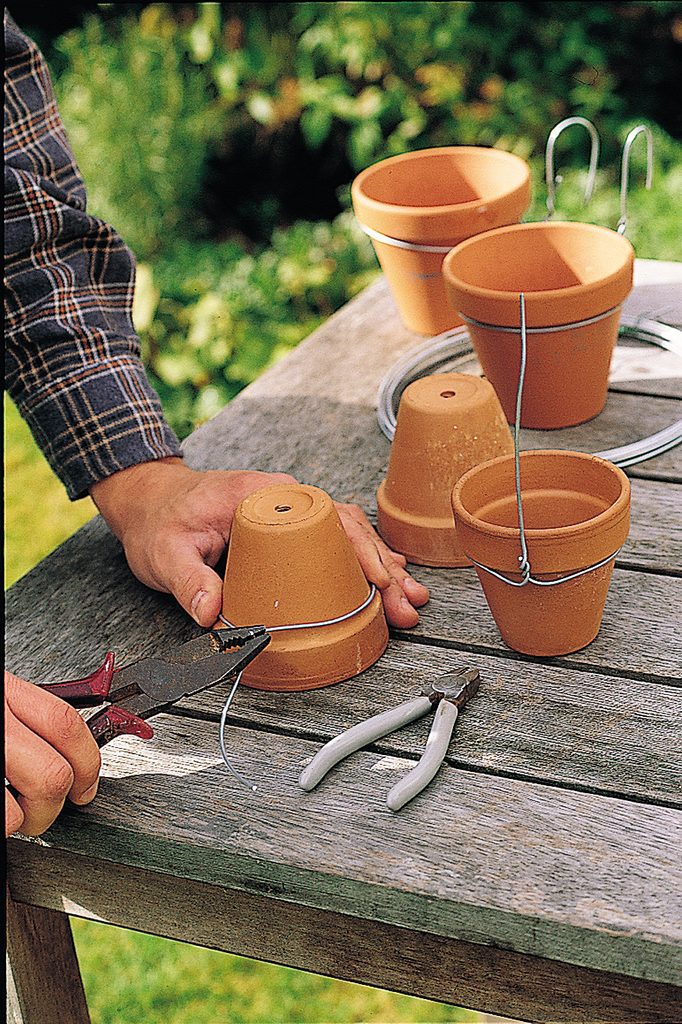
Twist one end of the wire over itself and pinch tight with pliers, leaving one long end free for hanging.
Step 4
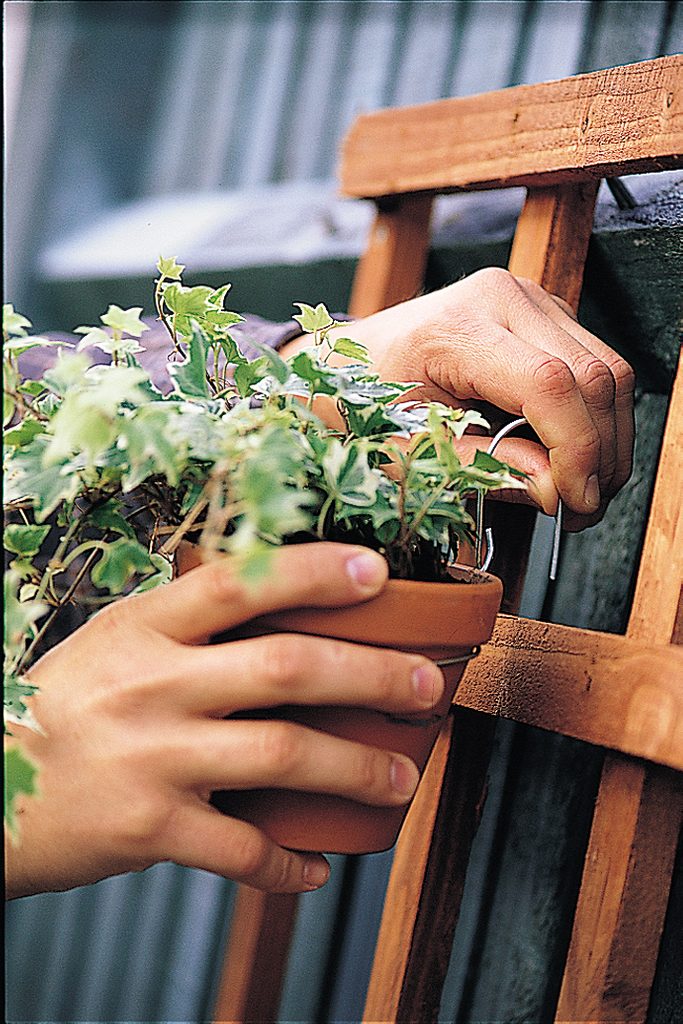
Bend the long end of the wire to make a hook that fits snugly over a horizontal piece of trellis. Add as many pots to the trellis as you like, and add plants to suit your style!